Thursday 23 February 2023

How to Put AdSense Code in the Blogger Post Body

1. Find the <head> tag in your blogger template and place the latest jquery just below it. Please avoid using two jquery links. Remove the older one and use the new version.

<script src="//ajax.googleapis.com/ajax/libs/jquery/1.10.1/jquery.min.js" ></script>

2. Second look for this code <data:post.body/> inside Blogger theme and replace it with the following code –

<div id="PostBody">
 <data:post.body/>
</div>

<div id="AdCode">
<div style='margin:5px 0;text-align:center;clear:both;'>
 <!-- Ad Unit Code Here -->
</div>
</div>

New Blogger template may have 2 or 3 <data:post.body/> code. You should have to identify correct one. Generally 2nd instance of <data:post.body/> is right code to replace in new blogger templates.

3. Now search for </body> tag inside Blogger theme and put the following javascript before/ just above it.

<b:if cond='data:blog.pageType == &quot;item&quot;'>
<script>
 $AdCode = $("#AdCode").html();
 $("#PostBody br:lt(1)").replaceWith($AdCode);
 $("#AdCode").remove();
</script>
</b:if>

4. Save the changes made in the Blogger theme and have fun.

You can choose your Ad location –

By replacing the value br:lt(1) with br:eq(n), where n= 1, 2, 3… which is the number of line breaks after which Ad will appear in your post. E.g., If you want to show Ad after the 5th line break, then replace br:lt(1) with br:eq(5), and you are done.


Tuesday 24 January 2023

Creating widget areas in anywhere in blogger

Some of you have noticed that many blogs have AdSense Units or other ads and widgets in the header section of the blog, one of the most popular format being the AdSense 468x60 ad unit.

gadget inside blogger header

Unfortunately, we are not always able to add a widget inside the blogger header as a Blogspot user. The reason is that if we are using the Blogger default template, or any other customized template available on the internet, the header may be locked and have no option to Add a gadget inside it or just next to the blog title.

The reason why some bloggers are using AdSense ads or different widgets in a blog header is because of its maximum of number of impressions. For instance, when a visitor goes to a page, this will be the first place where he would give a first look and this makes it one of the hottest spots in our blog.
But how we can add something inside blogger header - be it a Adsense unit, a search bar, social sharing buttons, or a widget? By simply adding a section in the blog's header. First off, to give space for the extra gadget to fit in, our blogger header should be resized.

Important!
Before anything, we need to make a back-up of our Blogger template so that if we do make any major errors, we can easily restore the original working template to our blog.

To make a back-up, go to Template and on the right side - click on the "Backup/Restore" button.


Clicking on this button, will prompt you to save your existing template as an XML file to your hard drive. You can change the name of the file and choose the location to ensure it is easy to find if you need to use this later.


Resize blogger header


Step 1. Go to Blogger Dashboard, click on Template > Edit HTML

Step 2. Click anywhere inside the code area and open the search box by using the CTRL + F keys:

adsense, blogger tricks, blogger widgets

Step 3. Add this code inside the search box, then hit Enter to find it:
<b:section class='header' id='header' maxwidgets=
Note: If you can't find it, make sure that you have no space at the beginning of it.

Step 4. Replace class='header' with class='header header-left'.

Step 5. Now we need to find - CTRL + F - the following line of code:
<div class='header-cap-bottom cap-bottom'>
And just above this line, we should see two div tags:
</div>
</div>
<div class='header-cap-bottom cap-bottom'>
Step 6. Paste the HTML code below just above these div tags:
<div style='clear:both;'/>

Now, let's go one step forward and add an extra gadget section within our Blogger header!

Add a new gadget/widget element to the Blogger Header


Step 7. Just above <div style='clear:both;'/> (step 6)... add this code:
<b:section class='header-right crosscol' id='header-right' maxwidgets='1' showaddelement='yes'/>
Step 8. Now find this tag:

    </head>

Step 9. Just above the </head> tag, add this CSS styling:
<style>
.header-left{
display: inline-block;
float: left;
}
#header-right {
display:inline-block;
float:right;
}
</style>
Note: if your widget is wider than overall area that both elements should occupy, then you might need to add the margin-right property to move it more on the right - see this example:
<style>
.header-left{
display: inline-block;
float: left;
}
#header-right {
display:inline-block;
float:right;
margin-right: -20px;
}
</style>
Step 10. Press the Save Template button to save the changes.

Step 11. Go to Layout of your blogger blog and you should see two gadgets on the header area.
You don't have to worry if the Add a Gadget element doesn't appear side by side as every blogger template is different. They might be slightly up or down or sometimes they might overlap each other. Just make sure that you drag the newly created widget just below the Header section.

widgets for blogger, blogger tricks

As I mentioned before, the header section could be one of the most valuable places in a blog. In that gadget/widget you can add anything like Adsense ads, search boxes, social sharing buttons, or you could, as well, sell that space for advertisement to boost your income.
http://helplogger.blogspot.in/2012/03/how-to-add-gadgetwidget-inside-your.html

Adding a section (with Add a gadget link) in Blogger layout

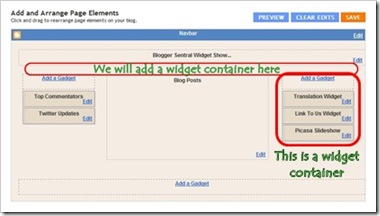
A  section is an area in Blogger layout that acts as a widget/gadget container. It is sometimes mistakenly addressed a page element. In Design > Page Elements tab, you can identify a section by the presence of an Add A Gadget link.
To add a widget, simply click the Add A Gadget link in your preferred location and proceed with selecting a widget. But what if your preferred location doesn’t have an Add A Gadget link? In other words there is no widget container there.
page elements add container

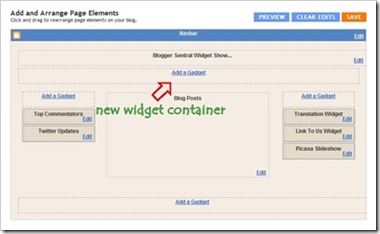
Well we can always make one, by adding a section tag in template HTML. Here is the code:
<!-- New widgets container Start -->
<b:section class='NewContainer' id='NewContainer'/>
<!-- New widgets container End -->
You are free to change the Id and class names.
In this tutorial we will add a section under the header. This is a perfect place to put horizontal navigation tabs. Here are the steps:
  1. Go to Dashboard > Design > Edit HTML.
  2. Back up your template.
  3. Since we are placing the new section under the header, we need to find the header code:
    <div id='header-wrapper'>
    <b:section class='header' id='header' maxwidgets='1' showaddelement='no'>
    <b:widget id='Header1' locked='true' title=Your Blog Title(Header)' type='Header'/>
    </b:section>
    </div>
  4. Paste the section code right below the header code, like this:
    <div id='header-wrapper'>
    <b:section class='header' id='header' maxwidgets='1' showaddelement='no'>
    <b:widget id='Header1' locked='true' title=Your Blog Title(Header)' type='Header'/>
    </b:section>
    </div>
    <!-- New widgets container Start -->
    <b:section class='NewContainer' id='NewContainer'/>
    <!-- New widgets container End -->
  5. Click Save Template.
  6. Go to Design > Page Elements to view the result. You should see a newly added section under the header. page elements added
  7. Now you can add all the widgets you want into the new container.
  8. To style the section, you simply add a styling rule in CSS, like this: 
    #NewContainer { 
    /* add styling declarations here */ 
    }
    And place it before ]]></b:skin> line in your template.
  9. That’s it, enjoy!

Monday 16 January 2017

Reading Time indication for Post in Blogger

At post : 
Reading time: <span class="eta"></span> (<span class="words"></span> words) 
 
In the footer: 
 
 <script src="//ajax.googleapis.com/ajax/libs/jquery/1.9.0/jquery.min.js"></script>
<script src="http://michael-lynch.github.io/reading-time/js/readingTime.min.js"></script>
      
        <script>
      
            $(function() {
          
                $('#Blog1').readingTime({
                    wordCountTarget: '.words',
                });
              
            });
      
        </script>
 
 
Source: https://github.com/michael-lynch/reading-time

Tuesday 13 December 2016

Latest Layerslider & Js composer download link

http://files.commercegurus.com/

Wednesday 2 November 2016

SEO Siren eBooks FREE DOWNLOAD

SEOSiren PROVIDES THREE EBOOKS AND LINKS FOR FREE.
 1) How to Get Super Fast Alexa Rankings Within 30 Days – eBook
2) Ultimate Guide to Recover from Google Unnatural Links Penalty – eBook
3) List of 10,000+ High PR Website Directories in Excel Sheet – 2013
All Can be Downloaded from below link
Click Here

Saturday 8 October 2016

Rainbow colors Effect on link Hover - How to Create?


Add below code to html widget
<script type='text/javascript'>

//<![CDATA[

var rate = 20;

if (document.getElementById)
window.onerror=new Function("return true")

var objActive; // The object which event occured in
var act = 0; // Flag during the action
var elmH = 0; // Hue
var elmS = 128; // Saturation
var elmV = 255; // Value
var clrOrg; // A color before the change
var TimerID; // Timer ID

if (document.all) {
document.onmouseover = doRainbowAnchor;
document.onmouseout = stopRainbowAnchor;
}
else if (document.getElementById) {
document.captureEvents(Event.MOUSEOVER | Event.MOUSEOUT);
document.onmouseover = Mozilla_doRainbowAnchor;
document.onmouseout = Mozilla_stopRainbowAnchor;
}

function doRainbow(obj)
{
if (act == 0) {
act = 1;
if (obj)
objActive = obj;
else
objActive = event.srcElement;
clrOrg = objActive.style.color;
TimerID = setInterval("ChangeColor()",100);
}
};

{
if (act) {
objActive.style.color = clrOrg;
clearInterval(TimerID);
act = 0;
}
}


function doRainbowAnchor()
{
if (act == 0) {
var obj = event.srcElement;
while (obj.tagName != 'A' && obj.tagName != 'BODY') {
obj = obj.parentElement;
if (obj.tagName == 'A' || obj.tagName == 'BODY')
break;
}

if (obj.tagName == 'A' && obj.href != '') {
objActive = obj;
act = 1;
clrOrg = objActive.style.color;
TimerID = setInterval("ChangeColor()",100);
}
}
}


function stopRainbowAnchor()
{
if (act) {
if (objActive.tagName == 'A') {
objActive.style.color = clrOrg;
clearInterval(TimerID);
act = 0;
}
}
}


function Mozilla_doRainbowAnchor(e)
{
if (act == 0) {
obj = e.target;
while (obj.nodeName != 'A' && obj.nodeName != 'BODY') {
obj = obj.parentNode;
if (obj.nodeName == 'A' || obj.nodeName == 'BODY')
break;
}

if (obj.nodeName == 'A' && obj.href != '') {
objActive = obj;
act = 1;
clrOrg = obj.style.color;
TimerID = setInterval("ChangeColor()",100);
}
}
}


function Mozilla_stopRainbowAnchor(e)
{
if (act) {
if (objActive.nodeName == 'A') {
objActive.style.color = clrOrg;
clearInterval(TimerID);
act = 0;
}
}
}


function ChangeColor()
{
objActive.style.color = makeColor();
}


function makeColor()
{
// Don't you think Color Gamut to look like Rainbow?

// HSVtoRGB
if (elmS == 0) {
elmR = elmV; elmG = elmV; elmB = elmV;
}
else {
t1 = elmV;
t2 = (255 - elmS) * elmV / 255;
t3 = elmH % 60;
t3 = (t1 - t2) * t3 / 60;

if (elmH < 60) {
elmR = t1; elmB = t2; elmG = t2 + t3;
}
else if (elmH < 120) {
elmG = t1; elmB = t2; elmR = t1 - t3;
}
else if (elmH < 180) {
elmG = t1; elmR = t2; elmB = t2 + t3;
}
else if (elmH < 240) {
elmB = t1; elmR = t2; elmG = t1 - t3;
}
else if (elmH < 300) {
elmB = t1; elmG = t2; elmR = t2 + t3;
}
else if (elmH < 360) {
elmR = t1; elmG = t2; elmB = t1 - t3;
}
else {
elmR = 0; elmG = 0; elmB = 0;
}
}

elmR = Math.floor(elmR).toString(16);
elmG = Math.floor(elmG).toString(16);
elmB = Math.floor(elmB).toString(16);
if (elmR.length == 1) elmR = "0" + elmR;
if (elmG.length == 1) elmG = "0" + elmG;
if (elmB.length == 1) elmB = "0" + elmB;

elmH = elmH + rate;
if (elmH >= 360)
elmH = 0;

return '#' + elmR + elmG + elmB;
}

//]]>

</script>